Installation Guide for Yale Smart Lock
Installation Guide for Yale Smart Lock
Ready to make your front door smarter? This guide will walk you through installing your new Yale Smart Lock in about 30 minutes. For the physical installation, all you’ll need is a standard Phillips head screwdriver.
We’ll start with a 5-minute pre-check to prevent common setup issues. Once the hardware is in place, connecting it to the Yale Access app is the final, simple step. A key-free life is just a few moments away.
Before You Start: A 5-Minute Door Compatibility Check
Let’s take five minutes to make sure your door is ready. This quick check prevents surprises and ensures a perfect fit. Grab a tape measure and check three key spots on your door:
- Backset: Is the distance from the door’s edge to the center of the lock hole either 2-3/8” or 2-3/4”?
- Door Thickness: Is your door between 1-3/8” and 2-1/4” thick?
- Main Hole: Is the large hole your current lock sits in 2-1/8” across?
If your measurements line up, your door is a perfect match and you’re ready to begin.
Step 1: How to Remove Your Old Deadbolt
Look at the inside part of your current lock—the side with the thumbturn. You should see two main screws holding it in place. Using your Phillips head screwdriver, remove both of these to pull the lock hardware apart from both sides of the door.
If the lock is stuck, it’s likely from years of paint. To avoid chipping the finish, carefully score the paint around the lock’s edge with a utility knife before pulling it away. This is a great tip for a professional-looking result.
Finally, face the thin edge of your door and remove the two smaller screws holding the deadbolt mechanism in place. The bolt will now slide out. It’s smart to put all the old parts into a small bag, just in case.
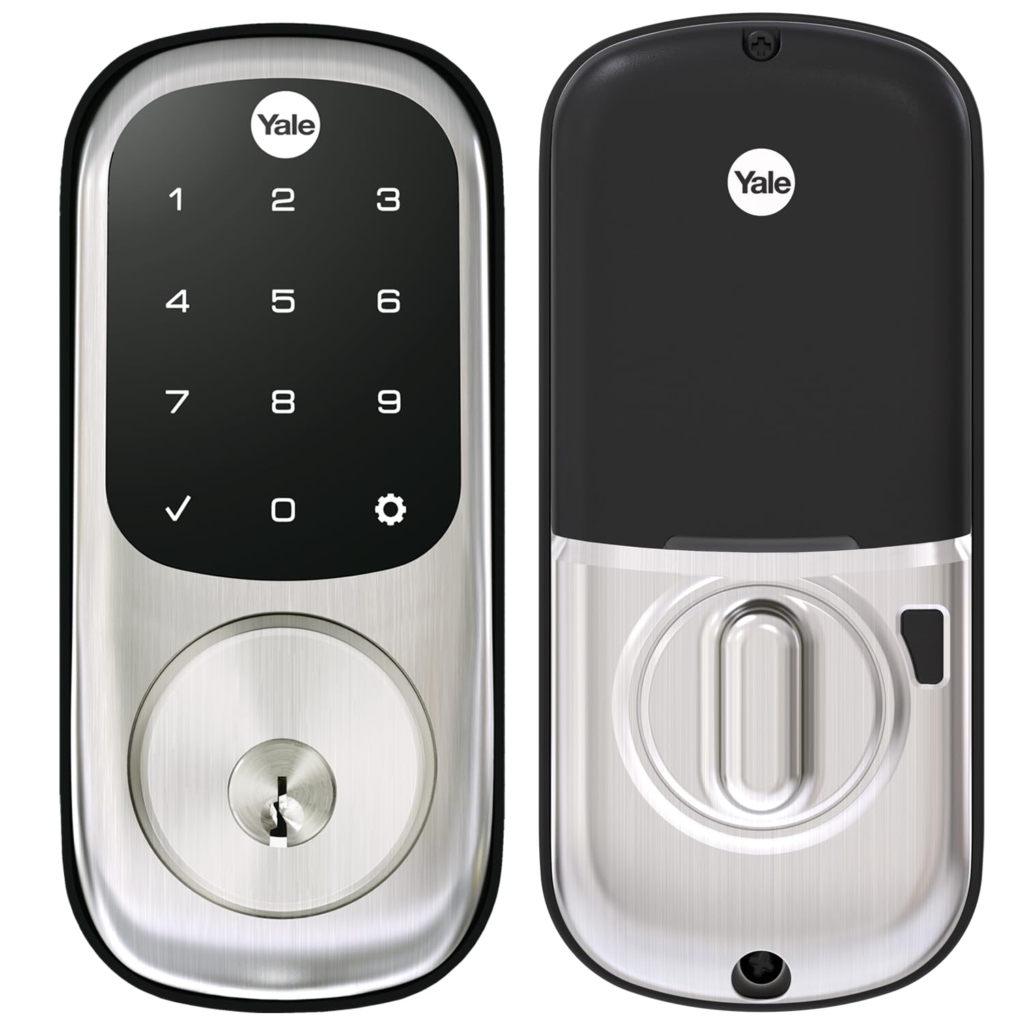
Step 2: Installing the Keypad and Deadbolt
First, grab the new Yale deadbolt. It can extend or shorten to fit different doors. Twist the mechanism until it clicks into the length that matches your door, then slide it into the door’s edge.
Now, take the exterior keypad and locate the thin black Data Cable. As you feed the cable through the door hole, it is crucial that it passes underneath the deadbolt. Routing it over the top will pinch the cable and prevent the lock from getting power.
Once the cable is safely through, guide the keypad’s tailpiece through the center of the deadbolt and press the keypad flush against the outside of your door.

Step 3: Powering Up and Performing the Manual Lock Test
On the interior side, find the small port on the inside lock assembly where the data cable plugs in. Connect the cable and tuck any excess wiring away from moving parts. Slide off the battery cover, insert the four included AA batteries, and listen for a brief welcome chime.
Before attaching the assembly, perform the most important check. Slide the assembly over the tailpiece and turn the thumbturn by hand. Does the deadbolt extend and retract smoothly, without catching? A successful manual test prevents nearly all future “jammed” errors.
If you feel resistance, the alignment is slightly off. Gently wiggle the keypad and interior assembly while turning the thumbturn until the bolt moves freely. Once it’s smooth, secure the interior assembly to the mounting plate with its two small screws.
Step 4: Making Your Lock Smart with the Yale Access App
With the physical work done, download the “Yale Access” app. Inside the lock’s battery compartment, you’ll find a small QR code sticker. In the app, tap “Set up a New Device” and scan that code to identify your lock model.
Your phone will connect to the lock using Bluetooth, so stay within a few feet of the door for this initial pairing. The app will provide simple, on-screen instructions. For iPhone users, this is when you can connect the lock to Apple HomeKit.
Finally, the app will guide you through a quick calibration by automatically operating the deadbolt. This is how the lock “learns” the locked and unlocked positions for your door. Once you see the success message, your installation is complete!
Bonus: Connecting the Wi-Fi Bridge for Remote Control
Your lock uses Bluetooth for nearby control. To unlock its full potential—like checking your lock’s status from anywhere—you’ll use the included Yale Connect Wi-Fi Bridge. The bridge allows your lock’s Bluetooth signal to speak to your home’s Wi-Fi.
For the best performance, plug the bridge into a standard power outlet located somewhere between your new smart lock and your home’s Wi-Fi router. A hallway is often a perfect location.
With the bridge plugged in, open the Yale Access app, tap the menu icon, and select “Set Up a New Device.” The app will automatically find the bridge and guide you through the quick connection process.
Quick Fix Checklist
If you run into an issue, use this quick troubleshooting guide to solve it.
- Error: ‘Calibration Failed’.
- Fix: Open the door fully and re-run calibration from the app’s Lock Settings.
- Problem: App can’t find the lock.
- Fix: Make sure your phone’s Bluetooth is on and you are standing within 5 feet of the lock.
- Problem: Bolt jams when door is closed.
- Fix: The hole in your door frame is misaligned. Use a metal file to slightly enlarge it until the bolt moves freely.
You didn’t just install a lock; you took complete control of your home’s entry. Enjoy the peace of mind that comes from a job you did—and can maintain—yourself.


Leave a Reply
Want to join the discussion?Feel free to contribute!